In Day 1 with Rails, we built a simple application that let us manage a list of categories using the powerful generate scaffold script. Today, we’ll look under the hood and learn about the code that was created for us, so that we can modify the application to do just what we want (or, rather, what the tutorial Four Days on Rails tutorial did, as I continue to update that tutorial for Rails 2.)
You’ll get the most out of Day 2, if you already know Ruby or you first read chapters 0-3 of the humble little Ruby book or some other introduction to the language. Or, of course, you can just wing it.
You also should know about the MVC (Model View Controller) design pattern. Although if you don’t know MVC already, you’ll get the hang of it soon, at least from the Rails perspective. The Getting Started Guide has a nice intro to MVC and elaborates on how Rails applies this venerated pattern:
2.1.1. Models A model represents the information (data) of the application and the rules to manipulate that data. In the case of Rails, models are primarily used for managing the rules of interaction with a corresponding database table. In most cases, one table in your database will correspond to one model in your application. The bulk of your application’s business logic will be concentrated in the models.
2.1.2. Views Views represent the user interface of your application. In Rails, views are often HTML files with embedded Ruby code that performs tasks related solely to the presentation of the data. Views handle the job of providing data to the web browser or other tool that is used to make requests from your application.
2.1.3. Controllers Controllers provide the “glue” between models and views. In Rails, controllers are responsible for processing the incoming requests from the web browser, interrogating the models for data, and passing that data on to the views for presentation.
In today’s tutorial, we will learn about:
h1 {font-size: 150%}
h1,h2 {font-style: bold}
img
{
border:2px solid silver;
margin:0px 0px 15px 20px;
}
blockquote, pre.code {
border: solid 1px #aaa;
padding: 6px;
background-color: #eee;
color: inherit;
overflow:auto;
margin: 10px 0px;
}
h1 {font-size: 150%}
h1,h2 {font-style: bold}
img
{
border:2px solid silver;
margin:0px 0px 15px 20px;
}
The Model
The definition of the model is in one of the files generated by scaffold:
app/models/category.rb
class Category < ActiveRecord::Base
end
This is a Ruby file that declare a class named Category that inherits from class ActiveRecord::Base. To define a class in Ruby, you place the class keyword at the beginning of a line, followed by the class name and a < and the class it inherits from.
Active Record is one of the “gems” installed with Rails. Looking in the Ruby on Rails api documentation for ActiveRecord::Base in the Classes section shows all of the methods, attributes, exceptions and other parts available in class ActiveRecord::Base.
An instance of the class Category could be called anything but the Rails convention is to use a variable named category or @category. The :: symbol is the Ruby scope operator. In ActiveRecord::Base it means that you are referring to the Base of ActiveRecord and not some other base.
note: I’ve adapted this nice explanation from Fairleads along with language note from the humble little ruby book)
We will customize our Model by adding code here.
Validation
Let’s say we want to make it so that each category appears once and only once in the category list. If you try that now, you’ll notice that the application allows a duplicate entry. Go ahead and delete the duplicate. We’ll make sure it isn’t allowed in the future, by adding validation to the model.
Rails gives you a lot of error handling for free (almost). To demonstrate this, add some validation rules to the empty category model:
app/models/category.rb
class Category  1..20
validates_uniqueness_of :title, :message => "already exists"
end
These entries will give automatic checking that:
- validates_length_of: the field is not blank and not too long
- validates_uniqueness_of: duplicate values are trapped. I don’t like the default Rails error message – ‘xxx has already been taken’ – so I provide my own. Note: This is a general feature of Rails – try the defaults first; if you don’t like anything, overwrite it.
Documentation: ActiveRecord::Validations::ClassMethods
To try this out, now try to insert a duplicate record. This time, Rails will you prevent you from creating a duplicate record (see below). The style is a bit in your face — it’s not the most subtle of user interfaces. However, what do you expect for free?

The Controller
Let’s look at the code behind the controller. The controller is where the programming logic for the application
lies. It interacts with the user using views, and with the database through models. You should be able to read the
controller and see how the application hangs together.
Some methods of the controller along with the class definition produced by the scaffold script are listed below:
app/controllers/categories_controller.rb
class CategoriesController  @categories }
   end
end

# GET /categories/1
# GET /categories/1.xml
def show
   @category = Category.find(params[:id])

   respond_to do |format|
      format.html # show.html.erb
      format.xml  { render :xml => @category }
   end
end
:
:
# DELETE /categories/1
# DELETE /categories/1.xml
def destroy
   @category = Category.find(params[:id])
   @category.destroy

   respond_to do |format|
      format.html { redirect_to(categories_url) }
      format.xml  { head :ok }
   end
end
end
Note that just like the model, the controller is simply a ruby class file. Each method in the class defines an action. Actions, by default, render a template in the app/views directory corresponding to the name of the controller and action after executing code in the action. For example, the index action in our Categories controller renders a list of categories; however, note that unlike index, the destroy action will not render a template. After performing its main purpose (calling destroy on the category object that the user selected), it initiates a redirect instead.
Note: there is quite a bit of Ruby magic going on in the generated controller file with exactly how the respond_to block works. Perhaps I’ll dive into that once I’ve got the basics down.
Views
Views are where the user interface is defined. Rails can render the final HTML page presented to the user from three components:
- Layout. A layout provides common code used by all actions, typically the start and end of the HTML sent to the
browser. - Template A Template provides code specific to an action, e.g. ‘List’ code, ‘Edit’ code, etc.
- Partial A Partial provides common code which can be used in used in multiple actions.
If you look at the view files generated by the scaffold command, you will see that they are .erb files. I’m not sure what ‘erb’ stands for, but they have replaced .rhtml files in previous versions of Rails. These files are a mix of html markup with snippets of ruby code in them.
- app/views/
- categories/
- index.html.erb
- show.html.erb
- new.html.erb
- edit.html.erb
- layouts/
- categories.html.erb
- categories/
Layout
Rails Naming conventions: if there is a template in appviewslayouts with the same name as the current controller then it will be automatically set as that controller’s layout unless explicitly told otherwise.
apps/layouts/categories.html.erb
<!DOCTYPE html PUBLIC "-//W3C//DTD XHTML 1.0 Transitional//EN"
"http://www.w3.org/TR/xhtml1/DTD/xhtml1-transitional.dtd">


<html xmlns="http://www.w3.org/1999/xhtml" xml:lang="en" lang="en">

<head>

   <meta http-equiv="content-type" content="text/html;charset=UTF-8" />

   <title>Categories: <%= controller.action_name %></title>

   <%= stylesheet_link_tag 'scaffold' %>

</head>

<body>


<p style="color: green"><%= flash[:notice] %></p>


<%= yield  %>


</body>

</html>
This is mostly HTML, plus a few bits of Ruby code embedded within tags. This layout will be called by
the rendering process regardless of the action being run. It contains the standard HTML tags – the
<html><head>...</head><body>...</body></html> that will appear on every page.
The Ruby bits in bold are translated into HTML during the Rails rendering process as follows:
- action_name is an ActionController method which returns the name of the action the controller is processing (e.g. ‘Edit’) – this puts an appropriate title on the page, depending on the action being run.
Documentation: ActionController::Base - stylesheet_link_tag is a Rails helper – a lazy way of generating code. There are a lot of these ‘helpers’ within Rails. This one simply generates the following HTML:
<link href="/stylesheets/scaffold.css" media="screen" rel="Stylesheet" type="text/css" />
Documentation: ActionView::Helpers::AssetTagHelper - flash Rails provides a technique for passing ‘flash’ messages back to the user – e.g. an ‘Update Successful’ message which displays on the next screen and then disappears. These can be picked up easily when included in the layout (adding it to the Layout means it will appear on any screen). (The flash message will, of course, only appear when the previous screen sends such a message.
Documentation: ActionController::Flash - yield is the key to what happens next. It allows a single standard layout to have dynamic content inserted at rendering time based on the action being performed (e.g. ‘edit’, ‘new’, ‘list’). In Ruby the yield command will execute a block of code that is passed as an argument. In this case, the code will insert dynamic content from a Template with the same name – see below.
Documentation: see Ruby language docs.
Templates
Rails naming convention: templates are held in appviews’controller”action’.erb.html. The basic list action is perhaps easiest to understand. This is the default action for the controller and is therefore the ‘index’ template
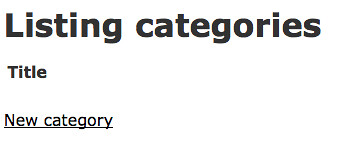
app/views/categories/index.erb.html
<h1>Listing categories</h1>
<table>
<tr>
<th>Title</th>
</tr><% for category in @categories %>
<tr>
<td><%=h category.title %></td>
<td><%= link_to 'Show', category %></td>
<td><%= link_to 'Edit', edit_category_path(category) %></td>
<td><%= link_to 'Destroy', category, :confirm => 'Are you sure?', :method => :delete %></td>
</tr>
<% end %>
</table><br />
<%= link_to 'New category', new_category_path %>
Below are some notes about the more interesting bits of code highlighted (bold) above
- for … in … end This is some simple Ruby code to loop through the items in the array @categories. The enclosed table rows are rendered for each category in the list.
- h automatically ‘escapes’ HTML code. One of the problems with allowing users to input data which is then displayed on the screen is that they could accidentally (or maliciously) type in code which could break the system when it was displayed. For example, think what would happen if a user typed in
</table>as a Category. To guard against this, it is good practice to ‘HTML escape’ any data which has been provided by users. This means that e.g.</table>is rendered as </table> which is harmless. Rails makes this really simple – just add an ‘h’ as shown - confirm is a useful optional parameter for the link_to helper — it generates a Javascript pop-up box which forces the user to confirm the Destroy before actioning the link.
- link_to simply creates a link — the most fundamental part of HTML… <a href="/categories/2">Show</a>
Documentation: ActionView::Helpers::UrlHelper
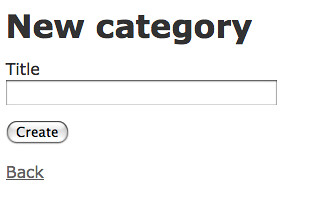
The ‘new’ action template created by the scaffold script is given below:
app/views/categories/new.erb.html
<h1>New category</h1>
<% form_for(@category) do |f| %>
<%= f.error_messages %><p>
<%= f.label :title %><br />
<%= f.text_field :title %>
</p>
<p>
<%= f.submit "Create" %>
</p>
<% end %><%= link_to 'Back', categories_path %>
form_for is part of the Rails FormHelper class. The 'new' form is defined with the block of Ruby code between do and end. Form helpers are designed to make working with models much easier compared to using just standard HTML elements by providing a set of methods for creating forms based on your models. This helper generates the HTML for forms, providing a method for each sort of input (e.g., text, password, select, and so on). When the form is submitted, the form inputs will be bundled into the params object and passed back to the controller. The form that is generated can be seen here:
<form action="/categories" class="new_category" id="new_category" method="post"><div style="margin:0;padding:0">
<p>
<label for="category_title">Title</label><br />
<input id="category_title" name="category[title]" size="30" type="text" />
</p>
<p>
<input id="category_submit" name="commit" type="submit" value="Create" />
</p>
</form>
Documentation: ActionView::Helpers::FormHelper
Tailoring the Generated Scaffold Code
The code generated by the Scaffold script is perfectly usable 'out of the box', and is robust once you have added enough validation into your data model. However, if that's all there was to developing Rails applications, then all the Rails apps would be boring. Now that we understand a little bit of what's going on, we can start to tailor the application to do exactly what we want.
Modifying the Controller
In a list view, as we can see on the mail page, I would expect the records to be displayed in alphabetical order. This requires a minor change to
the controller:
appcontrollerscategories_controller.rb (excerpt)
# GET /categories
# GET /categories.xml
def index
@categories = Category.find(:all, :order=>'title')respond_to do |format|
format.html # index.html.erb
format.xml { render :xml => @categories }
end
end
Remember that Category is an ActiveRecord, so you can look up the find method on ActiveRecord::Base and see all the nifty options.
Documentation: ActiveRecord::Base.find
In this application, the show screen is unnecessary - all the fields fit comfortably on a single row on the screen.
So, def show can disappear, and let's go straight back to the list screen (categories index) after an 'Edit':
(excerpt)
(excerpt)
# POST /categories
# POST /categories.xml
def create
@category = Category.new(params[:category])respond_to do |format|
if @category.save
flash[:notice] = 'Category was successfully created.'
format.html { redirect_to :action => "index" }
format.xml { render :xml => @category, :status => :created, :location => @category }
else
format.html { render :action => "new" }
format.xml { render :xml => @category.errors, :status => :unprocessable_entity }
end
end
end# PUT /categories/1
# PUT /categories/1.xml
def update
@category = Category.find(params[:id])respond_to do |format|
if @category.update_attributes(params[:category])
flash[:notice] = 'Category was successfully updated.'
format.html { redirect_to :action => "index" }
format.xml { head :ok }
else
format.html { render :action => "edit" }
format.xml { render :xml => @category.errors, :status => :unprocessable_entity }
end
end
end
The flash message will be picked up and displayed on the next screen to be displayed - in this case, the list screen.
Sharing Variables between the Template and Layout
Below you can see that I've moved the <h1>...</h1> heading text out of the Template into the Layout so that we can keep the formatting consitent across pages. As each template will have a different heading, I need to set the value of the variable @heading in the Template. Rails is quite ok with this - Template variables are available to Layouts at rendering
time.
appviewslayoutscategories.html.erb (exceprt)
<head>
<meta http-equiv="content-type" content="text/html;charset=UTF-8" />
<title>Categories: <%= controller.action_name %></title>
<%= stylesheet_link_tag 'scaffold' %>
</head>
<body>
<h1><%=@heading %></h1>
...
app/views/categories/index.html.erb (excerpt)
<% @heading = "Categories" %>
<table>
<tr>
<th>Title</th>
</tr>
<% for category in @categories %>
<tr>
<td><%=h category.title %></td>
<td><%= category["created_at"].strftime("%I:%M %p %d-%b-%y") %></td>
<td><%= category["updated_at"].strftime("%I:%M %p %d-%b-%y") %></td><td><%= link_to 'Edit', edit_category_path(category) %></td>
<td><%= link_to 'Destroy', category, :confirm => 'Are you sure?', :method => :delete %></td>
</tr>
<% end %>
</table>
Since we removed the 'show' action above, I've also removed the link in the categories list view. Then I added created_at and updated_at, which if you recall from Day 1, were auto-generated for us as part of the scaffold.
Instead of the default date format (e.g. Sat Dec 13 23:26:19 UTC 2008), we're using a Ruby method strftime() to format the date and time fields (e.g. 11:26 PM 13-Dec-08)
Ruby Documentation: class Time
Partial Templates
You may have noticed that edit and new are almost idential. The scaffold does not assume that will be your design, so it doesn't prematurely optimize; however, in this app the new and edit pages share almost all of the same elements. Rails can allow these templates to share code by using a "partial" template. Create a new file called _category (all partial templates begin with an '_' per Rails convention) and insert the shared code:
app/views/categories/_category.html.erb
<% form_for(@category) do |f| %>
<%= f.error_messages %><p>
<%= f.label :title %><br />
<%= f.text_field :title %>
</p>
<p>
<%= f.submit button_name %>
</p>
<% end %><%= link_to 'Back', categories_path %>
This makes the edit and new templates very short and sweet. Note the use of the variable button_name, which you can see in action below.
app/views/categories/edit.html.erb (that's the whole thing!)
<% @heading = "Edit Category" %>
<%= render :partial => @category,
:locals => { :button_name => "Update"} %>
app/views/categories/new.html.erb
<% @heading = "New Category" %>
<%= render :partial => @category,
:locals => { :button_name => "Create"} %>
Now we have a nicely modular webapp following the DRY principle without that unsightly repeated code. We also understand much of the code that defines our little app.
What did we learn?
We learned about the following files that were created by the generate scaffold script:
- app/models/category.rb
- app/controllers/categories_controller.rb
- app/view/layouts/categories.html.erb
- app/view/categories/
- index.html.erb
- show.html.erb
- edit.html.erb
- new.html.erb
We also learned how to create a partial template: _category.html.erb.
I learned more of the Ruby language and how to navigate the Ruby API docs, and I hope you did too. This tutorial got a bit long and required quite a bit of changes from the old one. Please comment if you find any errors and I'll fix up up for posterity.
Notably absent from this tutorial has been the famous unit testing that I hear all good Ruby developers swear by. Perhaps I'll need to go offscript and read up on that for Day 3.
Stay tuned.